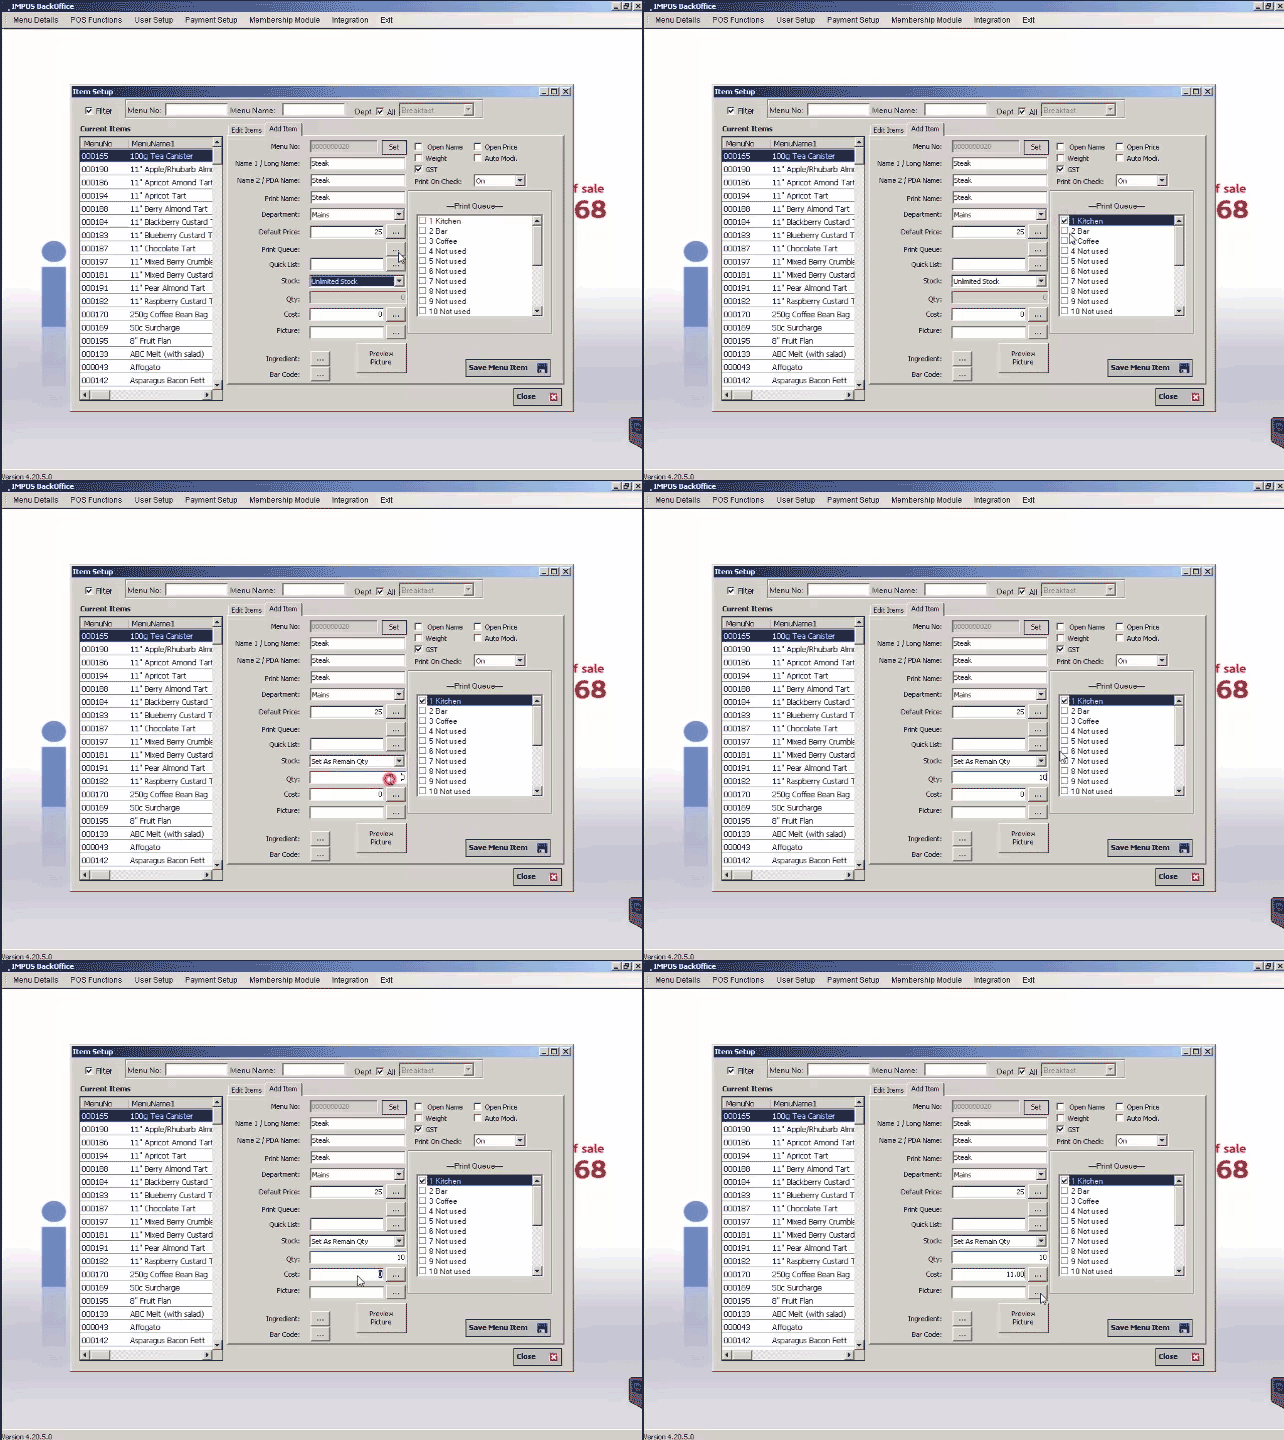
Select the ‘Add Item’ tab as shown below. Note – A new Menu Number will be created automatically. If you desire to enter a unique Menu Number you will need to select on Set to manually enter the desired menu number.
Enter the required information into the relevant sections;
Item Name – The Name of the item as it will appear on the menu. This will be the text that appears on the button and on the clients bill.
PDA Name – The name of the item as it will appear on the alternate language name of an item if a language other than English is being used or if a different name is required on a terminal. This second option for entering a menu name can be defined within the Configuration settings on the device.
Print Name – The name of the item that will appear on any of the associated printers for the particular item. This is handy for abreviations for the kitchen or bartender. The text here wil NOT appear on the bill.
Department – The department that the item belongs to for reporting purposes
Default Price – The default price of the item. This is the price that is most common for the item.
By selecting the ellipses button next to ‘Default Price’ you will open the pricing table for more pricing options;
Price Sets – You have the option of three different price sets. Price Sets can be defined to set different pricing structures for an item based on time based rules, setting price sets on demand or defining a price set based on a Sub-List. For further information on setting price sets and rules see [link for tutorial]
Price Levels / Price Adjustments – Each item can have up to 5 different Price Levels or Adjustments, these are commonly used for different sizes of the same item or for differentiating a Glass from a Bottle, for example. The different Price Levels are activated by selecting an adjustment before the item.
Print Queues – Selecting the ellipses button next to Print Queues will show the print queue defined per item.
It's a good idea to have your printers clearly labeled with the print queues that they are set to.
Quick Lists – Were originally designed to provide fast modifier options to be linked to a menu item. If you want to set minimum and maximum selection values for your items then you would be best to use Auto-Modifiers.
Using quick lists allows the option to select modifiers that will appear at the bottom of the main menu when an item is selected.
Click on the ellipsis button next to the Quick List option and you will be presented with a list of all your sub-lists. To create a sub list consisting of modifiers see section [insert cross-reference]
Select the sub-list you wish to assign as the quick list for this item
Select ‘Assign’ to assign the list.
Stock – Use the stock option to set the remaining quantity of an item, when the remaining quantity reaches 0, users will be warned when ordering the item that there is insufficient stock remaining. From the drop down box select ‘set as remain Qty’ and then enter the remaining quantity into the Qty section.
Note – a change to the remaining quantity from the back office will immediately affect all terminals connected to the network.

Cost – Use the Cost section to set the default cost of the item, by selecting the ellipses button next to the cost option you will be shown the cost options for the different price levels/adjustments
If you are using different price levels/adjustments for the item use corresponding cost values in this section.
A cost can be entered in for any Menu Item within ImPOS and the corresponding cost will be reflected in any Cost of Goods Sold (COGS) or Sales Margin based reports.
If you are using ImStock you can find out more about Cost here.
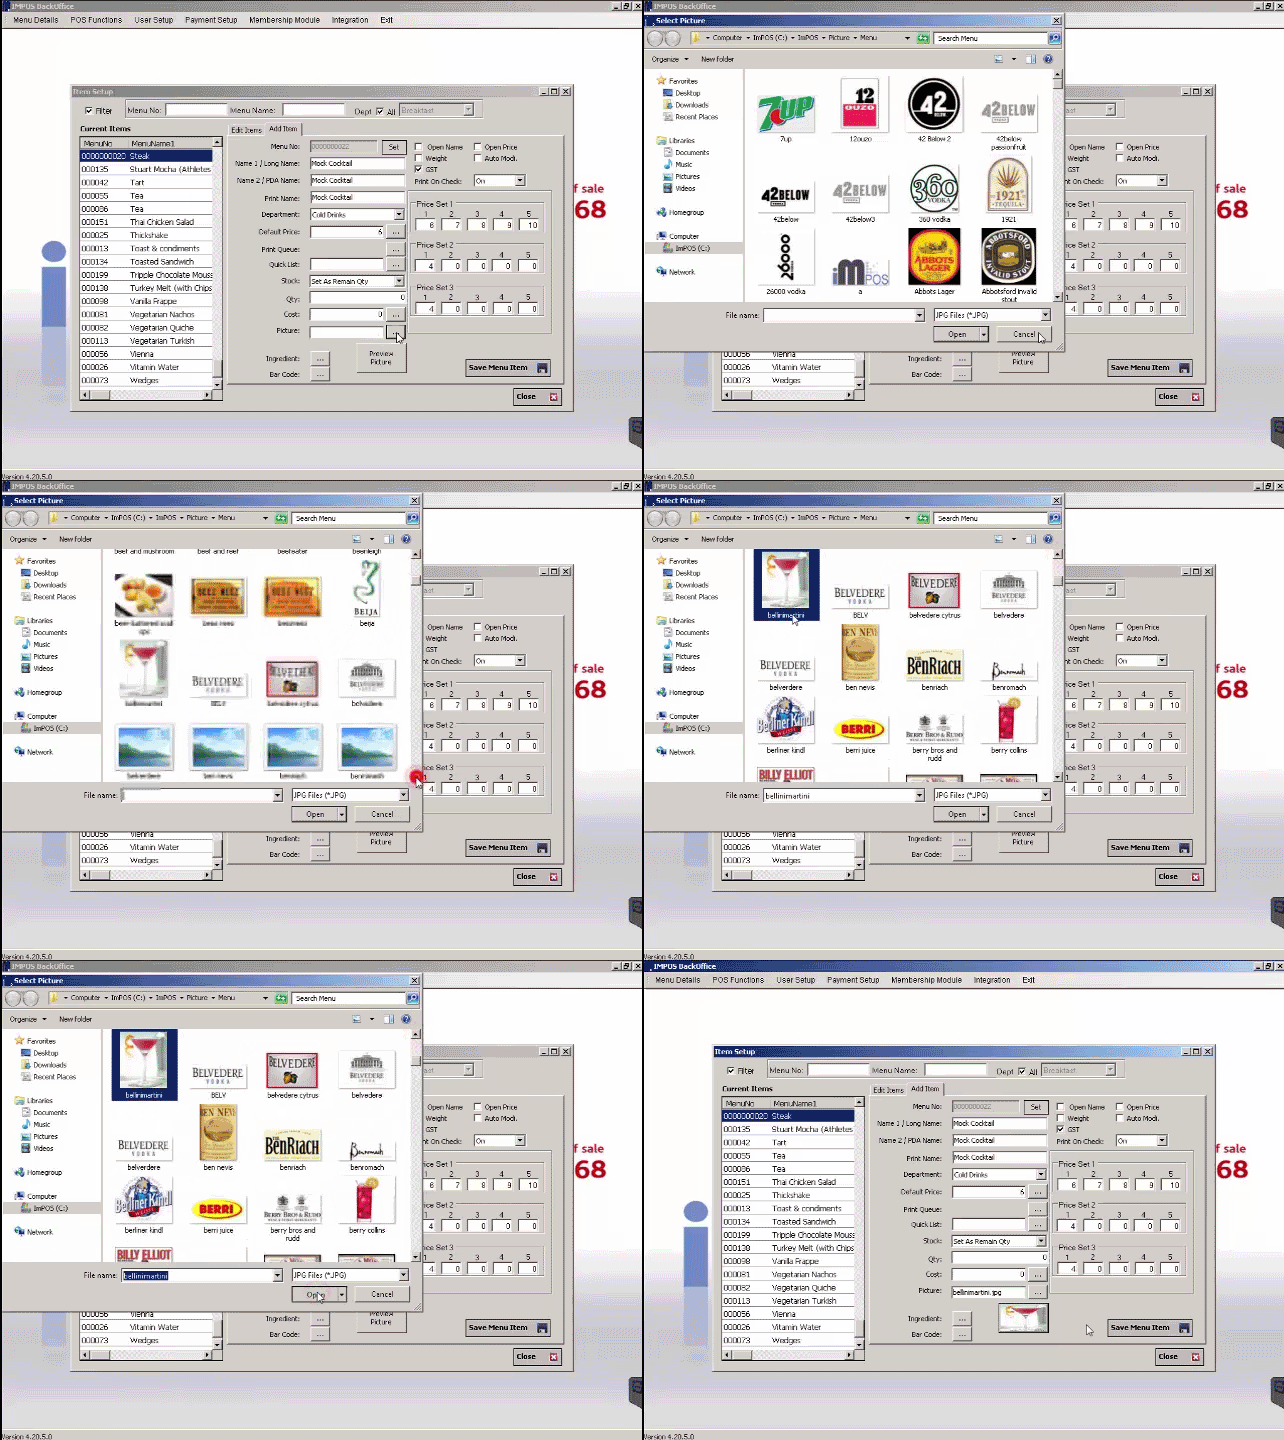
Picture – A picture or logo can be added for each item to display on the menu, selecting the ellipses button will open a window from which you can select a picture;
Select the picture you want to add to the item from the list provided.

Note – pictures are saved in c:\ImPOS\Picture\Menu folder. The picture preview button will allow you to view the picture you have selected as it will appear as a button on the menu. Each terminal is required to have a copy of the c:\ImPOS\Picture\Menu folder in order to display the relevant picture for each item.
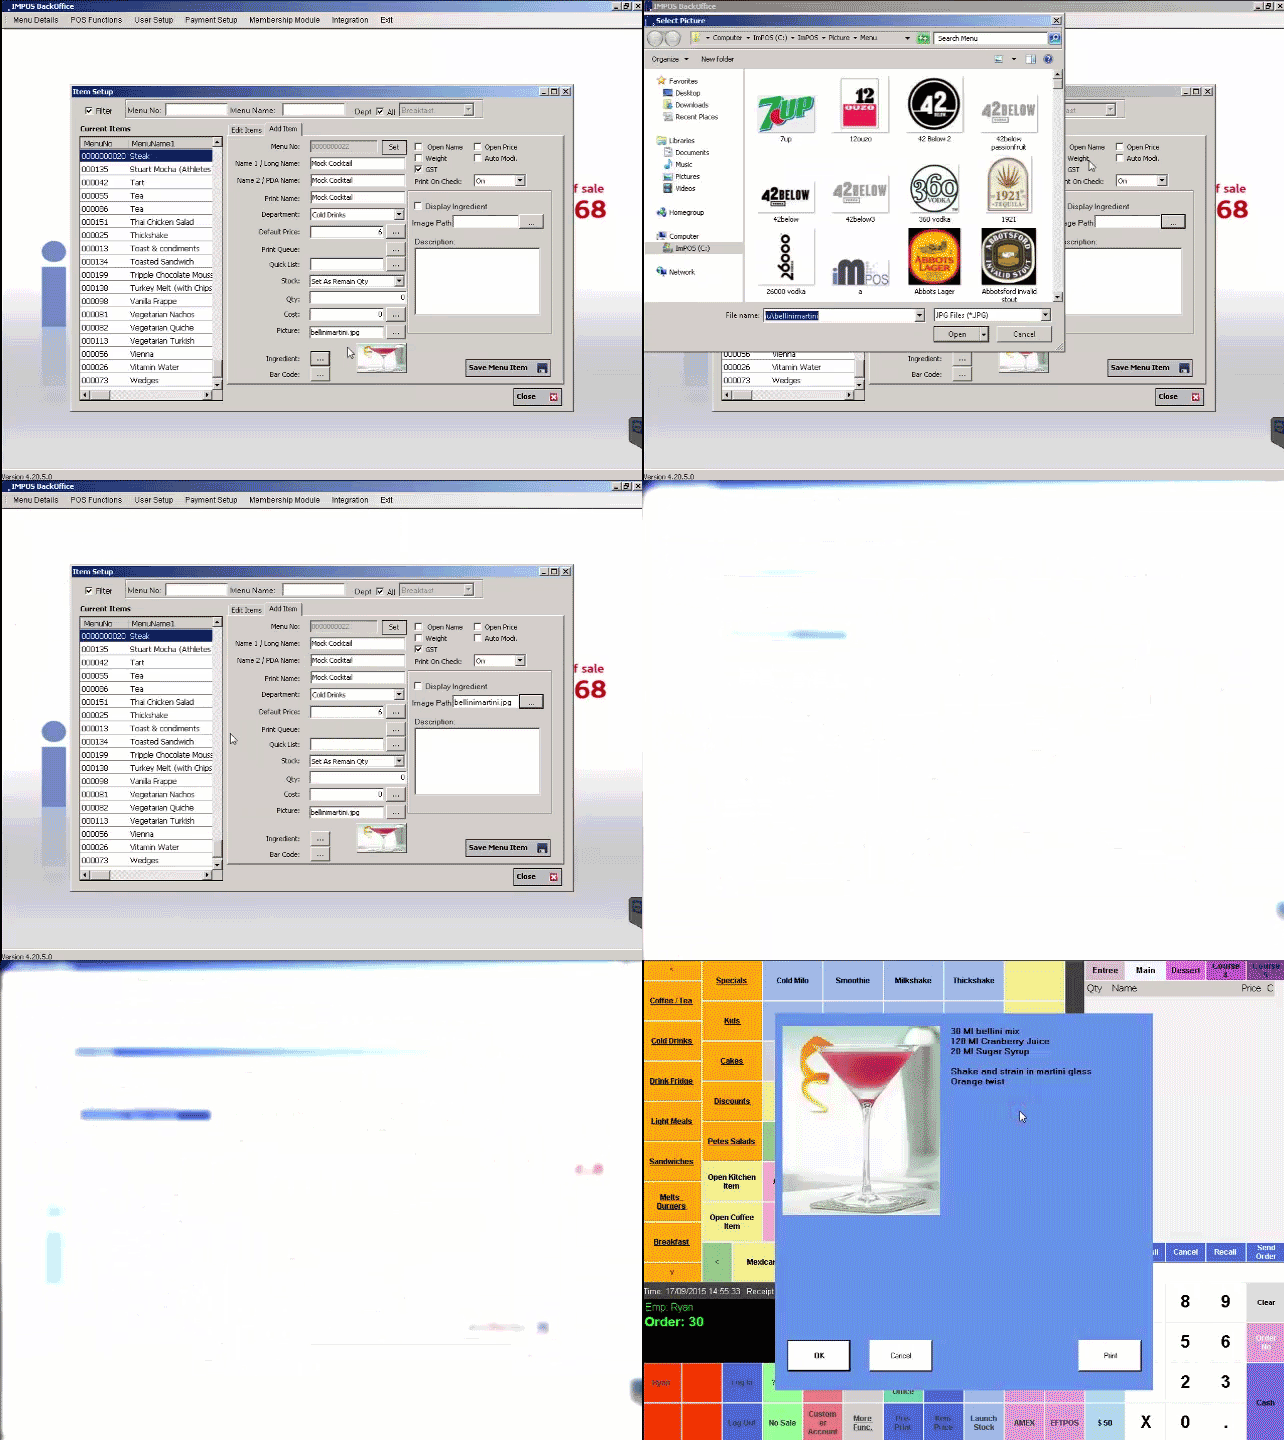
Ingredient – selecting the ellipses button next to ingredient will allow you to enter the ingredients or any other description that you wish to define for a particular item.
If you select the ‘Display Ingredient’ tick box the ingredients for this item will be displayed automatically when you select an item, if it is not selected you can show the ingredients by selecting the ‘?info?’ button before selecting the item. To place the ?info? button on the screen refer to section [insert cross-reference].
An image can be added to the ingredients information by selecting the ellipses button next to image path and then selecting the appropriate image from the images provided. The idea behind this was to allow a picture to be allocated for each menu item to show final presentation of a product and exactly how the product is to be presented to the client.

Note – this image can be different to the image chosen to be display on the menu.
The description section can be used to show how to make a particular product (for example cocktails) or to show what ingredients make up a product, which is great for identifying allergens or dietary requirements to your customers and to increase product knowledge across your team.
Barcode – if you are using barcodes to identify items you can enter multiple barcodes for an item by selecting the ellipses button next to barcode;
Enter the barcode in the field next to add and select the add button. This can also be done by placing your cursor in the blank field, scanning the barcode and selecting Add. To remove a barcode select the relevant barcode from the list of barcodes provided and select remove.
Open Name: This tick box to allows you to enter the name of the item manually after it is selected by using an on-screen keyboard.
Open Price: This tick box to allows you to enter the price of an item manually after it is selected by using an on-screen keyboard.
Weight: If you are using scales and you would like the unit price of an item to be multiplied by the weight of the item by using integrated scales.
Auto Modi: If you want the particular item to be displayed Within the Auto Modifier screen and have an option to Automatically prompt the user through a selection of modifiers. See the walk through here
An example is when a steak is selected; a list of cooking styles will be presented to choose from.
GST: By default each menu item within ImPOS is selected as GST inclusive.
There are three options for Print On Check
- On – the item will print on the customers receipt
- Off – the item will not print on the customers receipt
- Message – the item will be printed under the table, tab or order number on the kitchen docket. This setting may be used for kitchen messages through to the kitchen such as ASAP, HOLD, MAINS AWAY or for entering the name on an order. If the item is selected as Message then the item will not be printed on the customer bill.
Select the ‘Save Menu Item’ button to save the new item.
Editing Items
You can search for an already existing item by Menu No or Menu Name. You can narrow your search down by limiting the search results by department by un-selecting Dept All check box and selecting from the drop down list the particular department.
Type the Menu No or Menu Name in the appropriate field, a list of items that match the entered criteria will be displayed.
All items that contain the characters you enter into the search criteria fields will be displayed.
Select the desired item from the list provided. Upon selecting the item all relevant details pertaining to the item will be shown in the Edit tab on the left of the screen.
While searching for item you only need to enter part of the name of the item, this makes it possible to search for all the items that contain a word or part of a word, in the example below chips has been entered in the ‘Menu Name’ section to show all items that have the Word ‘Chips’ in their name.