Impos software allows a POS terminal or tablet to display the product cart for order verification, and company advertising on an attached screen for customer viewing.
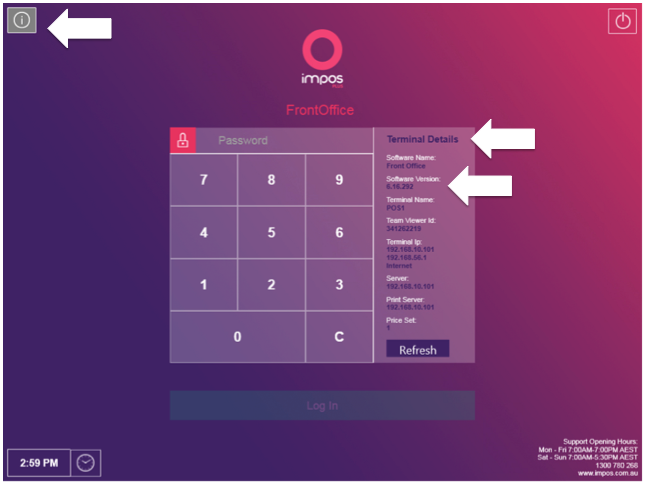
In order to enable this functionality, you’ll first need to be upgraded to version 6 or above. To check which version you’re using, press the ‘Info’ button on the login screen to see the version number. If you require an upgrade, please call support on 1300 780 268 to arrange this.

Each POS terminal can be paired with one customer display. Once the update has been completed and you have purchased an additional display screen from Impos, we can begin the configuration. Upon setup completion, an additional icon will appear on the POS screen. Use this icon to open the customer display on any connected secondary screen.

The customer display will operate without any customisations, displaying a standard splash screen when the product cart is empty, or there is no transaction active.

Once a transaction has begun, the customer display will show order information along with the contents in the cart.
Front Office cart contents:

Customer display:

You’ll notice that the ‘very weak’ modifier in the product cart does not appear on the customer display. This is because the modifier is set to not print on check.
All discounts will be totalled and summarised in the order discount section.
Once the transaction has been finalised the customer display screen is cleared and returns to the standard splash screen.
To customise the interface and behaviour of the customer display, open Back Office and select Configure Customer Display from the POS functions dropdown.

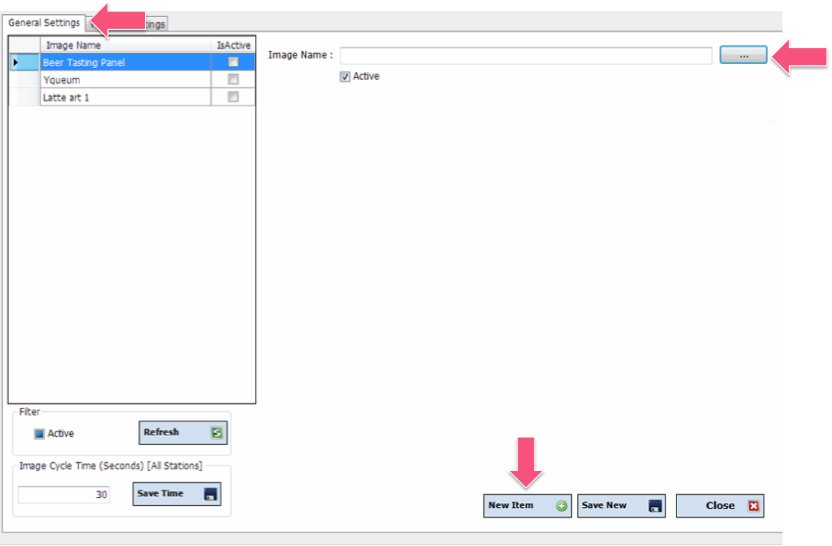
Within this view you can determine which images are available in the system, viewable under general settings, and nominate the desired images for the POS to display, viewable under terminal settings.
To add new images to your customer display library, head to general settings and select new item, then press the […] button to locate files on the local computer.

Once an item is selected, a preview of the image will be displayed. The image can be renamed for your own identification purposes. Once completed, select save new and the image will be added to the general library.
Each POS terminal will display all images by default. To assign specific images to a POS terminal, select the Terminal Settings tab, and select the POS terminal from the drop-down list. From here you’ll be able to determine which images are displayed next to the product cart in the Select Terminal Display Images check box. You can also select which image appears on the standby screen in the Terminal Standby Image section. The duration of the image display can be set by altering the Terminal Cycle setting. If no selections are made, the POS terminal will operate under the default settings.
To close the customer display, you’ll need to add close customer display function to the menu design. The below window must be closed and re-opened to allow the configuration changes to replicate.

FAQs
Can I have more than one image in the product cart but different images on the standby screen?
No, only images in the product cart can be used as standby images.
Can I attach any screen to my POS terminal?
Yes. Each computer can only have one customer display attached at any time, however other screens can be used.
Do the images have to be saved on each POS terminal?
No, the images are only required to be on the server.
Can I play videos on my customer display?
No, this function is not currently available.
Which image formats are accepted?
BMP, JPG and PNG formats are accepted.
If you have any questions please give Impos Support a call on 1300 780 268.