Purchase orders are used to ensure your stock ordering is consistent, easy, and visible to all members in your organization. They will form either an automatically generated or manually generated record of what is due to arrive from suppliers.
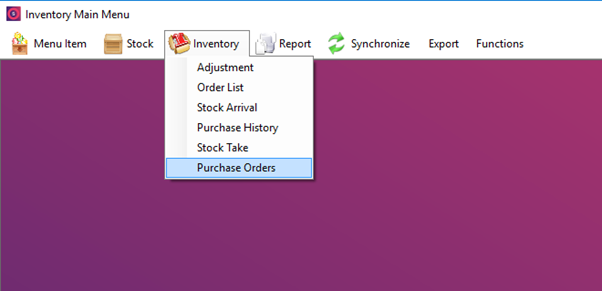
- Inventory
- Purchase Orders


- If this is the first time in creating purchase orders, you’ll need to use the “configure” button to input delivery address, default delivery dates etc.
- This window will show a list of all existing purchase orders currently in the system. This list can be filtered by using the Search Filters
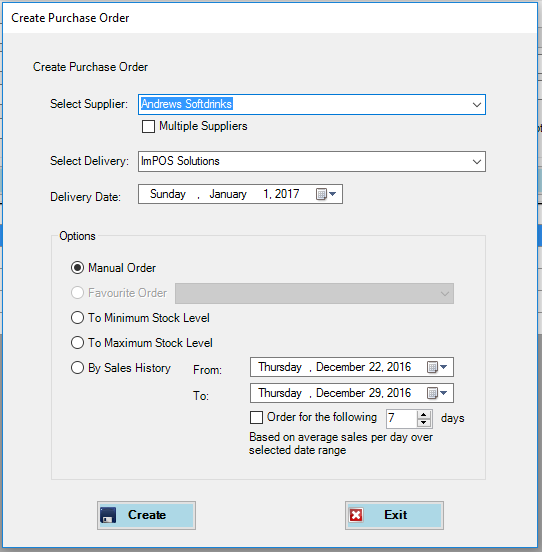
- Create a new purchase order.

- Select supplier – At this stage you can generate either single purchase orders or multiple. For the purposes of this training we will generate 1 at a time.
- Select delivery options - These are the details that will appear on your purchase orders when sent to suppliers. These can be configured through the Configure button on the Purchase order window
- Select delivery date - This as a default is set to 2 days from the date of order. This default can be changed in the configure button on the Purchase Order Window
- Select method for ordering
- Manual order will populate all stock items from the chosen supplier at initial 0 quantity to edit
- Favourite Order – This is if you have previously saved an order as a Favourite.
- Minimum Stock level will order in whole order units up to your minimum stock level (based on current Synchronized stock level)
- Maximum Stock level will order in whole order units up to your Par stock level (based on current Synchronized stock level)
- By Sales History: Orders stock based on a sales period in the system history, minus what is currently in your current synchronized stock level.
- Once the ordering method has been selected, a purchase order will be created.
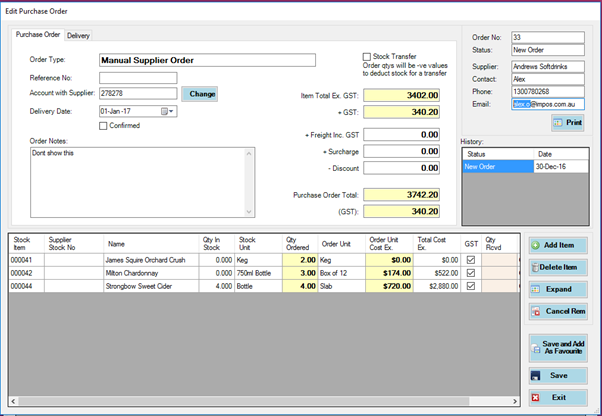
The following is the “Edit Purchase Order” window

- Reference number is related to the invoice number, however is currently left blank, this field will be filled when we accept the order
- Account with supplier is automatically populated from the supplier info as created in Stock items.
- The confirmed check box can be selected once the order has been confirmed by the supplier
- Order notes will only appear on this window when viewing the purchase order, it will NOT be present of the purchase order sent to the supplier.
- Any Freight, Surcharges or Discounts known at this point can be entered.
- Should you require any specific notes to be added to the delivery, these can be added in the Delivery Tab available in the top left corner of the window.
- Select stock to be ordered
- This can be done by either altering the Quantity ordered in the QTY Ordered column, OR by using the “Add Item” button to add additional line items to the purchase order.

- You can also Delete an item by using the Delete Item button. Please note this only deletes the product from the order list, not from the stock system.
- Print (this button is located on the top right corner, and enables you to print the order either physically or saved as a file to be emailed off to a supplier. If you have line items with 0 in Qty Ordered, the system will prompt if you would like these removed from the order.
- Once you have printed/saved the purchase order, the system will prompt to progress the order on to a Sent to Supplier flag.
- This purchase order will be saved in the system, awaiting the stock arrival.
- You are also able to save the order as a “Favourite” order by pressing “save and Add as a favourite”. You’ll be prompted to name the favourite order, to be selected later on when creating an additional purchase order.